Run server-side AB tests with feature flags
Learn how to run AB tests that are resolved on the server and use feature flags for gradual rollouts.
Server-side AB testing means the server decides which variation a visitor receives and renders it into the HTML before the response reaches the browser. Because the decision happens before delivery, there is no flicker, ad blockers cannot strip your results, and you can test functional behavior rather than only visible elements.
Feature flags are how you express that decision in code: the server resolves a flag per request, and your application branches on it. Instead of releasing multiple versions of your application, you use a flag to enable or disable a feature, allowing different user groups to experience different behaviors at the same time.
This approach is especially useful for more complex tests, as it decouples experimentation from releases. Teams can test ideas faster, reduce risk, and react immediately to results. If a variation underperforms or creates friction, you can disable it instantly without rolling back code or interrupting the user experience.
Since we resolve experiments on the server, feature flags also expand what you can test. Beyond copy or visual changes, you can test functional behavior, flows, or entirely new capabilities, while maintaining precise control over exposure and measurement.
In this tutorial, you will run a complete server-side experiment, from adding a slot to validating the results.
How it works
Every request follows the same path:
The SDK gets the visitor ID and sends it along with the content request.
We evaluate the audience, allocate the visitor, and select the content for the assigned variant. Allocation is deterministic, not random. We hash the visitor identifier with the experiment key and map it to a bucket, so the same visitor always lands in the same variant for a given experiment, and a reload never flips it.
The content arrives as structured data that your component, template, or loader uses to render the HTML.
We automatically track the exposure, with no extra call on your side.
When the visitor converts, your application tracks a goal event, and the results update in real time.
You are responsible for two of these steps: rendering the content and tracking the goal. Our SDKs and platform handle identity, assignment, exposure, and analysis.
Set up the experiment
Running a feature flag experiment follows a simple and structured flow.
Create a component for your flag
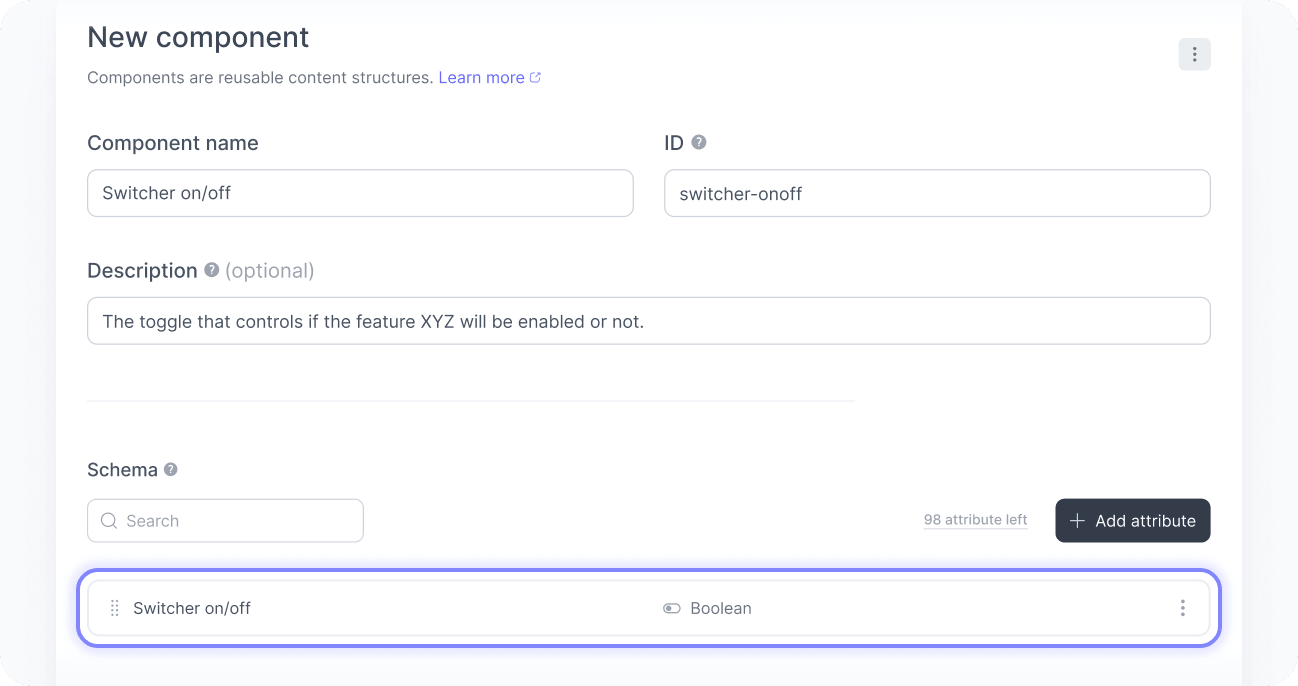
Start by creating a component that represents the flag that will enable or disable what you want to test. Typically, this component has only a boolean attribute that accepts a value for true and another for false, such as on and off or enable and disable. This attribute acts as the feature flag switch in your application.
Create a slot for your flag
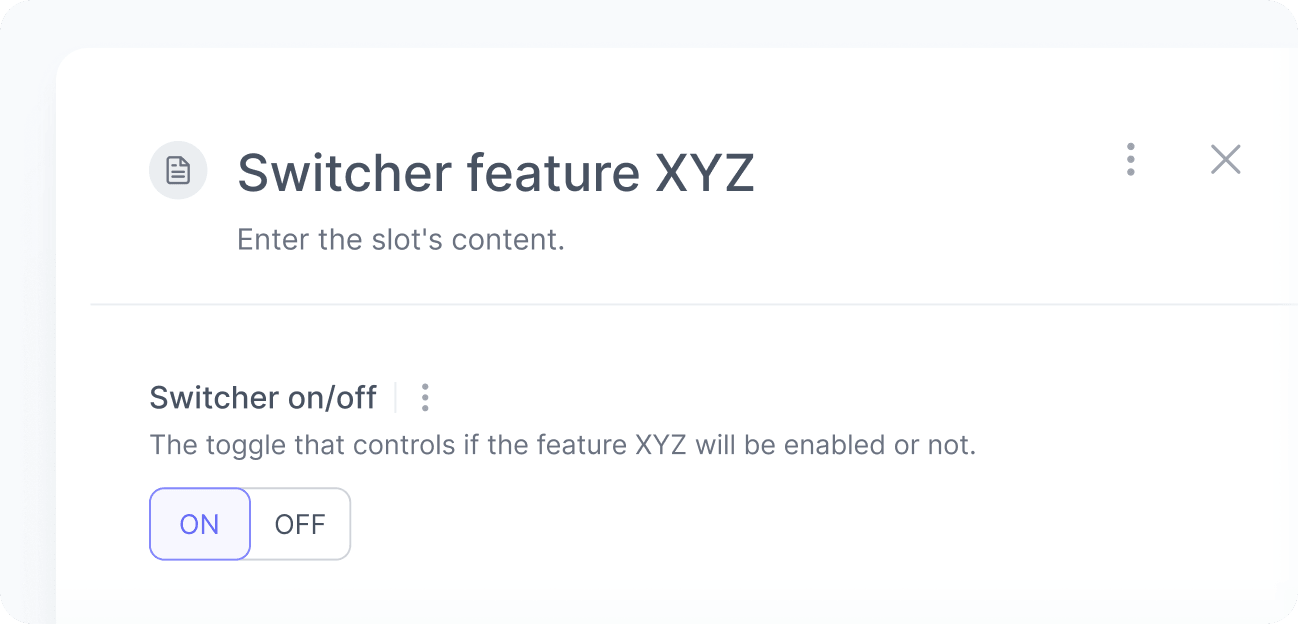
Next, create a slot to hold the value of your flag. Define a default value, which represents the behavior users will see before the experiment starts or when no experience is applied.
Add the slot to your project
Add it with the CLI:
npx npx croct@latest add slot --exampleThe CLI generates the type definitions, downloads the default content for use as an automatic fallback, and adds a working example to your project.
Fetch the content on the server
Fetch the slot content where your application renders on the server, and use the result as you would any other data:
import {fetchContent} from '@croct/plug-next/server';
export async function HomeHero() {  const {content: {switcher}} = await fetchContent('feature-xyz');
  return switcher ? <NewHero /> : <CurrentHero />;}
Because the content is resolved from the incoming request, the variant is decided per request, and the correct content is already present in the first HTML response. There is no hydration step where the content changes.
Notice that none of this code changes when you launch an experiment, add a variant, or end the test. It reads a slot. Everything else is configuration.
Prerendering and caching
Server-side experiments and static generation pull in opposite directions: a fully prerendered page is identical for everyone, so a cached page would serve one variant to all visitors and collapse the experiment.
We resolve this at the slot level rather than the route level. Only the parts of the page that fetch content opt into dynamic rendering, and the rest of your site stays prerendered.
Three approaches, in order of preference:
- Render the experimental component on the server
The page becomes dynamic, but only where it needs to be. This is the default and the recommended approach: no flicker, and the content is visible to crawlers.
- Stream the dynamic component
Ship the static shell immediately and stream the experimental region in.
- Render on the client
Use the client-side hooks and composables with an initial value when the route must remain a fully static file, such as a site served from a CDN with no server. This reintroduces a content update after load, so use it only when there is no server.
For the framework-specific details, see Prerendering in Next.js and Prerendering in Nuxt. Laravel, Symfony, and Hydrogen render on every request, so there is nothing to opt into. In Laravel and Symfony, the SDK marks personalized responses as private automatically so they are never stored in a shared cache. See Caching in Laravel and Caching in Symfony if you run a CDN or a reverse proxy in front of your application.
Configure your experiment
Experiments are configured in the platform, not in code. To create an experiment, you need to define:
| Setting | What it does |
|---|---|
| Primary goal | The conversion used to determine the winning variant |
| Traffic allocation | The percentage of eligible users who should enter the experiment |
| Variants | Between two and five content variations, one usually acting as control (baseline) |
Users who are eligible but not allocated continue to see the experience’s content. Users outside the audience see the slot’s default content. For niche audiences, we suggest you allocate 100% of the traffic so you collect enough data to reach statistical validity.
Finally, assign a different value to the flag for each one, such as on for one variant and off for the other.
Track conversions
The goal you select in the experiment must match a GoalCompleted event tracked in your application. Without it, the experiment collects exposures but no conversions.
Track the event in the browser, where the conversion actually happens:
'use client';
import {useCroct} from '@croct/plug-next';
export function SignupButton() {  const croct = useCroct();
  function handleClick() {    croct.track('goalCompleted', {      goalId: 'sign-up',    });  }
  return <a href="/signup" onClick={handleClick}>Sign up for free</a>;}
Besides the conversion event, you can also track the OrderPlaced, LeadGenerated, and UserSignedUp events for richer analysis.
Keep variants consistent across devices
When a visitor is identified, their user ID becomes the assignment key, so the variant follows them from laptop to phone to tablet instead of being tied to a single browser.
This does not require a call on every page. The SDK reconciles the visitor with the logged-in user once per request: where the framework has a standard authentication mechanism, it reads the identity from it out of the box, and otherwise you configure a user ID resolver once and it runs for every request from then on. That also keeps the identity in sync when a session expires or a token is renewed, which a single call at login cannot do. See the data collection guide for your SDK for how it detects the user, and how to reconcile with a different identifier, such as an email or a UUID, instead of the default one.
Identify the user explicitly only when neither applies, for example when the login happens outside the framework’s standard flow:
'use server';
import {identify} from '@croct/plug-next/server';
export async function identifyUser(userId) {  await identify(userId);}
Anonymize the visitor on logout in the same way, so the next person using that browser starts a fresh assignment.
To carry the assignment across devices, enable the cross-device consistency toggle in the experiment configuration.
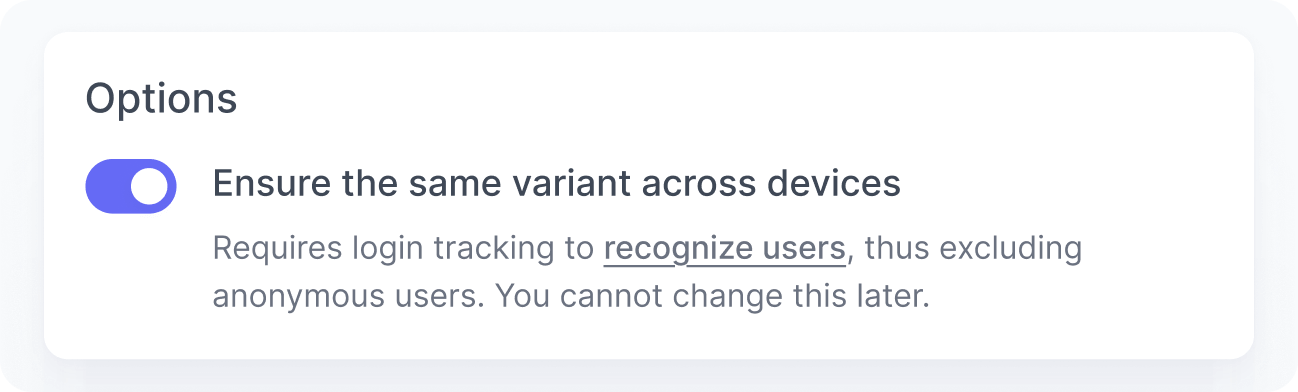
Anonymous visitors have no persistent cross-device identifier, so their assignment cannot be carried between devices. This is expected, not a misconfiguration.
Review and publish
Once everything is configured, review your setup and publish the experiment.
- Preview each variant
Use preview mode to verify that each variant renders correctly before publishing. The SDK detects the preview token from the incoming request automatically.
- Check the exposure count
In the experiment dashboard, confirm that the split between variants matches your configuration. A persistent imbalance means the assignment or the logging is dropping a class of user, and no other metric is worth reading until that is resolved.
- Confirm that goals are firing
Complete the conversion yourself and check that the event appears with the correct goal.
From this point on, we will handle the delivery of each variant and the collection of data. From there, monitor the results to understand how each variation performs and guide your next decisions.
Analyze the results
Feature flag experiments make it easy to understand how a feature impacts your key metrics. By comparing the performance of each variant, you can understand whether the new feature improves engagement, conversion, retention, or any other metric that matters to your business.
Because feature flags are dynamic, they also enable faster decision-making. If a variant shows signs of friction or negatively impacts performance, you can disable it immediately to limit exposure and avoid issues at scale. These real-time insights help teams identify problems early and refine features before completely rolling them out.
As a best practice, feature flags should be actively maintained. Regularly reviewing and removing unused or outdated flags prevents technical debt, keeps your codebase easier to manage, and reduces the risk of unexpected behavior in future experiments.